Multi Jet Fusion PA 12 GB (Glass Bead) 3D printing material

High-precision Multi Jet Fusion PA12 with glass beads, 3D printing for functional nylon parts, combining fine detail, strength, and a smooth surface finish ideal for industrial applications.

Colors

Finishes

Characteristics

Surface Look
Details
Strength
Flexibility

Multi Jet Fusion PA12 GB Material Guide

What is MultiJet Fusion PA 12 GB ?

MJF PA12 GB is a glass bead-filled polyamide 12 (PA12) material manufactured using HP Multi Jet Fusion technology. By combining the versatility of standard PA12 with glass bead reinforcement, this engineering-grade material offers increased stiffness, improved dimensional stability, and enhanced resistance to deformation

It is particularly well suited for functional parts, tooling, fixtures, housings, and end-use parts that require high accuracy and structural rigidity

Thanks to the precision of the MJF process, PA12 GB enables the production of complex geometries with consistent mechanical performance and excellent surface quality.

What is the difference with regular PA12 ?

Tensile modulus comparison PA12GB - PA12

Tensile modulus comparison (Mpa)

The main difference between MJF PA12 GB and standard PA12 is rigidity. Thanks to its glass bead reinforcement, PA12 GB offers a significantly higher tensile modulus, making parts much stiffer and more resistant to bending under load. This increased stiffness makes it an excellent choice for applications that require structural stability, precise positioning, or minimal deformation during use.

The trade-off is that PA12 GB is less flexible and slightly more brittle than standard PA12. If your application requires impact resistance, snap-fit features, or repeated bending, regular PA12 may be the better choice. For parts that prioritize rigidity, precision, and resistance to warping, PA12 GB is the preferred material.

What are the possible applications for this material?

With its excellent dimensional stability and enhanced stiffness, PA12 GB stands out as a high-performance material in industrial 3D printing. Reinforced with glass beads, it offers improved rigidity, reduced warping, and superior surface quality while maintaining the durability and reliability of PA12. These characteristics make it particularly well suited for functional prototypes, tooling, fixtures, and end-use parts requiring high precision and stable performance under mechanical loads.

Improved stiffness

Excellente wear resistance

Comes from recycled glass

A wide range of possible applications can take full advantage of the properties of PA12 GB:

  • Industrial jigs and fixtures
    Ideal for assembly, positioning, and inspection tools that must remain perfectly stable over time without bending or drifting out of tolerance.
  • Machine covers and protective housings
    The increased rigidity helps maintain shape for large or thin-walled parts, improving durability and perceived quality.
  • Functional brackets and structural supports
    Suitable for load-bearing components where deformation must be minimized, especially over long spans or flat geometries.
  • Robotics components and automation parts
    Used for mounts, arms, or sensor holders that require precise alignment and long-term dimensional stability.
  • Sliding or guiding components (low-load wear parts)
    The material’s improved surface stability makes it a good choice for guides, rails, or interfaces with moderate friction and repeated movement.
  • End-use industrial enclosures
    Particularly where parts must stay flat and rigid under mechanical stress or temperature variation.

Pricing​

The printing price of your design is calculated automatically the moment it is uploaded. As you modify your object (changing material, finishing, size, changing the quantity or hollowing feature, etc.) you will note that the price changes automatically. The pricing is based on a series of factors, including total volume, object size, and bounding box – to name a few.

For more information, check our pricing page

How does HP 3D printing technology work?

The Multi Jet Fusion technology’s process is similar to binder jetting technology as it uses a liquid binding agent to create the layers of your object. In addition, a detailing agent is used to obtain fine details and to smooth the surface of the object. Layer by layer, the object is created from the combination of the powder, the liquid agents (fusing and detailing agents) and the energy (heating process).

The HP Multi Jet Fusion process is a powder-bed technology that is faster than Selective Laser Sintering. After the parts are 3D printed, the building platform is placed into the post-processing station that cools the parts and prepares them for cleaning.

The Multi Jet Fusion process is similar to binder jetting technology as it uses a liquid binding agent to create the layers of your object. In addition, a detailing agent is used to obtain fine details and to smooth the surface of the object. Layer by layer, the object is created from the combination of the powder, the liquid agents (fusing and detailing) and the energy (heating process).

The HP process is faster than SLS technology but it still needs to cool. When the parts are 3D printed, the building box is placed into the post-processing station that cools the parts and prepares them for cleaning. 

Finishings available for PA12 GB material

Here are all options available after the Multijet Fusion 3D printing process:

  • Raw: Grey surface with no finish, as it comes straight out of the 3D printer. Ideal for prototyping and mechanical tests. The raw finish provides a surface that is more prone to scratches and impact marks.
  • Dyeing : Our Dyeing option is a premium finish developed with Sculpteo’s state-of-the-art technology. It gives your 3D printed parts a matte appearance that is resistant to friction and wear.
  • Painting : A high-end luxury finish with fully custom colors using RAL or Pantone standards for a premium aesthetic.
      Standard layer thickness

      80µm

      Accuracy

      Standard NFT 58000

      Normal class (category 3)

      Dimension mmPossible deviation  (mm)
      x ≤ 1±0,13
      1 < x ≤ 3±0,15
      3 < x ≤ 6±0,17
      6 < x ≤ 10±0,20
      10 < x ≤ 15±0,22
      15 < x ≤ 22±0,25
      22 < x ≤ 30±0,28
      30 < x ≤ 40±0,32
      40 < x ≤ 53±0,37
      53 < x ≤ 70±0,44
      70 < x ≤ 90±0,50
      90 < x ≤ 115±0,60
      115 < x ≤ 150±0,75
      150 < x ≤ 200±0,95
      200 < x ≤ 250±1,20
      250 < x ≤ 315±1,40
      315 < x ≤ 400±1,80
      400 < x ≤ 500±2,20

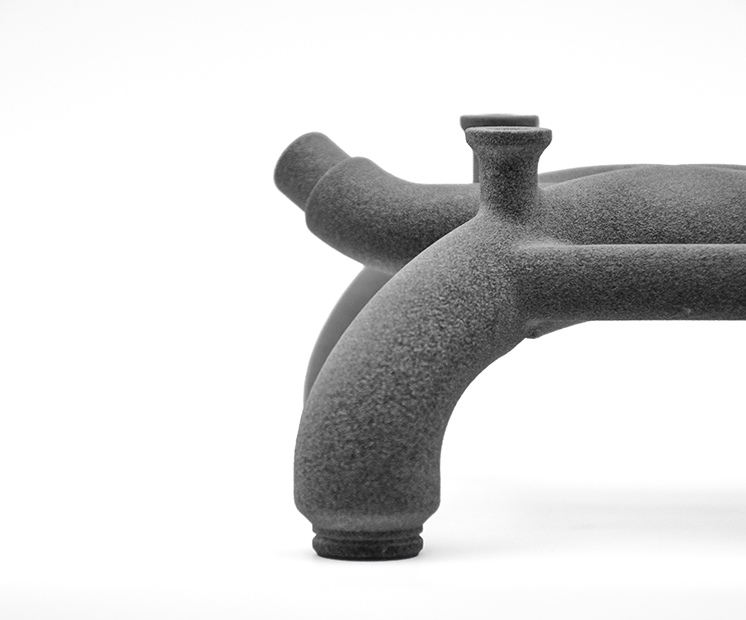
      Due to the printing process, your objects will have upskin and downskin. Upskin is a little concave, whereas downskin will show slight convex. Upskin will appear on the top of your object, downskin at the bottom. This is important to consider when you set the orientation of your 3D model. If the upskin and downskin will affect your design, set the orientation beforehand and we will do our best to honor it, otherwise our technicians will choose the best one.

      upskin downskin

      Maximum size370 x 274 x 380 mm 

      The maximum size of your models are limited by the physical size of our 3D printers – if you would like to print something bigger than this, feel free to contact us for some tips on how to cut / assemble parts.

      There is no minimum size for polyamide prints, keeping in mind minimum thickness for walls and structural aspects, to ensure the object will not break is 0.8 mm.

      Minimum wall thickness (flexible)

      0.8mm

      Maximum wall thickness*

      9 mm*

      Minimum wall thickness(rigid)

      2mm

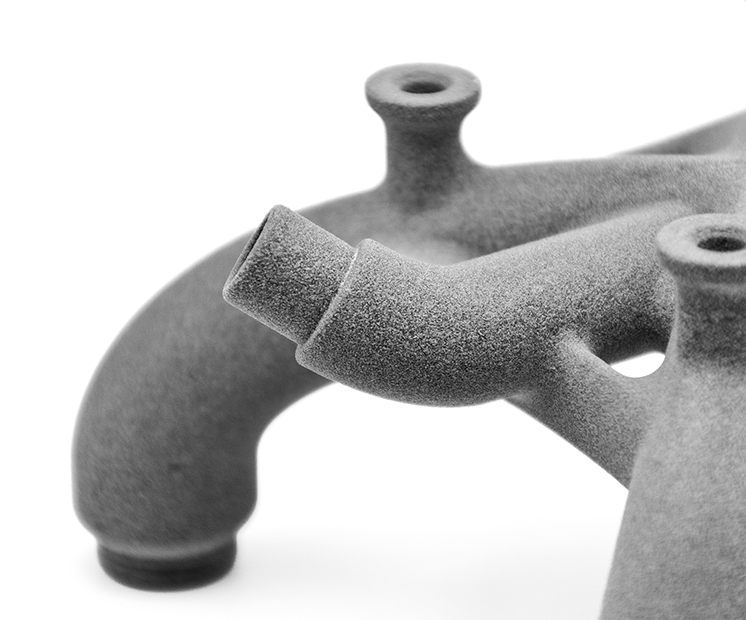
      Minimum wall thickness stemmed elements

      0.7mm with support 
      0.9mm without support 

      Minimum wall thickness particular design aspects1-2mm

      * We do not recommend wall thickness above 9mm as thicker walls can create manufacturing issues, such as deformation, surface aspect issues – Hollowing your parts should solve this issue. Feel free to contact us if you need help to proceed with making your part hollow.

      The walls of your design must adhere to a minimum thickness of 0.8 mm in order to guarantee the structure will not break. If the walls of your model are less than 0.8 mm, you can add a support structure to maintain stability.

      A stemmed element is a design aspect which is at least twice as long as it is thick. For unsupported and stemmed elements or parts of the design with a particular design constraint, it is also important to respect a minimum thickness of 0.9mm in order to guarantee the object will not break.


      Tip

      Icon to show that you can ad a support structure to maintain stability

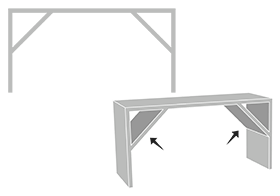
      Add a support structure to maintain stability. For example, if you are modeling a bust of a person, you can attach thin aspects of the design like the ears in more places around the model’s head. Doing that will avoid cantilevered and easily breakable elements in the final print.


      With a 0.8 wall thickness, your design will be slightly flexible. To obtain more rigidity, we advise a 2mm wall thickness.


      Good to know

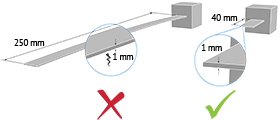
      Thin walls supporting large, heavy models can warp under the weight of itself.


      Sculpteo offers an online solidity check tool which highlights parts of the print that may be too thin for a print. From there you are able to tweak your design in order to create an object that is an appropriate thickness. To use it, you just need to upload your 3D file, select your material and click on “Verification” tab.

      It is also important to keep in mind that the object is to be printed into real life. Thus if a thin aspect is supporting something that is too heavy for it, it may break – even though it is possible within the physics provided by your 3D modeling software. We recommend adding a bit of thickness to the places that will get a lot of handling, or that support the most weight.


      Do not forget

      Icon to keep in mind that solidity check tool don't detect physical aberrations

      Keep in mind that our solidity check tool does not detect physical aberrations such as floating parts, unstable position, parts supporting too much weight relative to their thickness, etc. Particular care must be given to the geometry of your design and the most stressed parts must be thickened.


      Minimum size of details

      0.2 mm

      Minimum height and width details

      Embossed : 0.4 mm

       
      Engraved : 0.3 mm

      Minimum height and width for a readable text0.4mm
      Enlargement ratio

      1/1

      A detail’s minimum precision is mainly determined by the resolution of our 3D printers. However, during the cleaning process, a fine layer of detail can also be lost. In order for a detail and text to be visible we recommend following our recommended sizes at the very least.

      It’s possible that particularly fine embossings and engravings will not be visible, as the carving could get filled with excess powder that is later unable to be cleaned out. If an embossing or engraving is an essential part of your design we recommend making them as deep as possible. To ensure a better powder removal (thus a better detail visibility), the width of your details must be at least as big as depth.
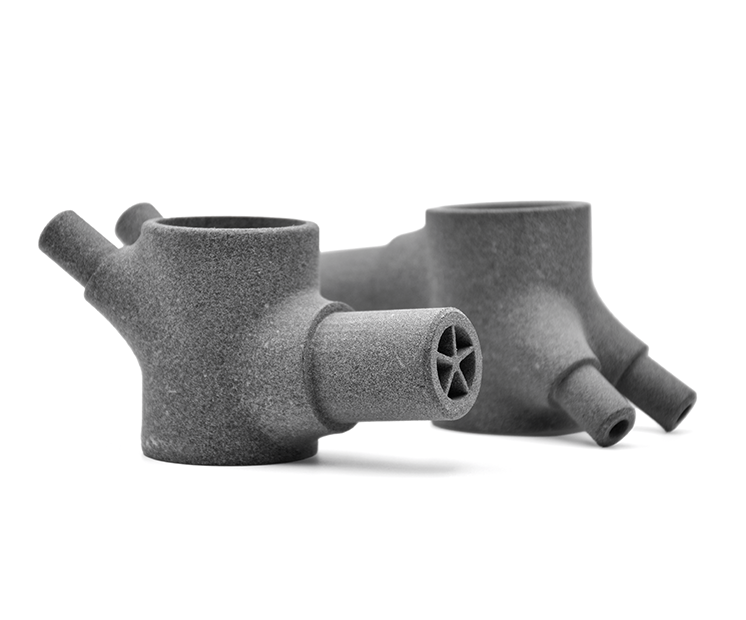
      Enclosed parts ?Yes
      Interlocking parts ?Yes


      Our Multi Jet Fusion material has the ability to print the most complex designs of our materials thanks to HP technology. An example of a complex design is a volume enclosed within another volume, like a chain or maraca. Our printers have the ability to print a fully interlocked chain, with no support structures to remove.
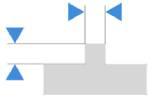
      Minimum spacing between fixed walls0.5 mm
      Minimum clearance between parts0.5 mm


      For a successful 3D print a minimum clearance between objects is required to allow excess material to be sand blown out. If this space is not left within the design, the object will be a solid. This is particularly important for articulated objects – as the space left between the walls will define the object’s ability to move.


      Do not forget

      Clearance should be at least 0.5 mm, however that is the minumum for small objects. Larger objects require more space between their parts. This is due to the HP printing process. Our printer beds are heated during the process, and larger objects are heated for longer periods. A small space between large objects runs the risk of melting together as it remains under heat for a long period of time. In some other cases, holes should be added to allow us to drain for the excess powder material within the clearance.
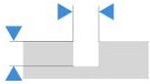

      Assembly ?Yes
      Minimum space0.5 mm


      Objects printed in polyamide can be printed to be assembled. As long as a width of at least 0.5 mm is left between the different parts of the object.
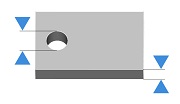
      Hollowing ?Yes


      Our online hollowing optimization tool has the ability to greatly reduce the price of a print by reducing the amount of material used.

      Using the tool requires adding two holes to your model, which will serve as the drain for the excess powder material within the object. The minimum size of these holes is determined by our website. Otherwise it is possible to hollow your object manually in your 3D modeling software.

      Files with Multiple Objects ?No

      It is not possible to 3D print a 3D file containing several objects with our 3D plastic printers.

      Mechanical PropertiesValueUnitConditions
      Density of  part1,3g/cm3ASTM D792
      Tensile Modulus (XY/Z)2900 / 3000MPaASTM D638
      Tensile strength (XY/Z)31 / 30MPaASTM D638
      Elongation at break (XY)9%ASTM D638
      Elongation at break (Z)5%ASTM D638
      Impact strength3kJ/m2ASTM D256
      Ready to 3D print with Multi Jet Fusion PA12 GB?

      With Sculpteo’s online 3D printing service you’re just a few clicks away from professional Multi Jet Fusion PA12 GB 3D printing. Your 3D model is printed with the highest quality and delivered straight to your door. 

      Get started now!

      Discover our other materials...